> ## Documentation Index
> Fetch the complete documentation index at: https://docs.doploy.io/llms.txt
> Use this file to discover all available pages before exploring further.
# Creating Your Instance
> Deploy your first Odoo instance on doploy
## Before You Begin
Make sure you've [created a project](/getting-started/creating-project) first.
**Using Odoo Enterprise?** Set up your [Odoo Enterprise access](/managing-odoo/odoo-enterprise) before creating your instance.
**Required Python Packages**\
If your Odoo customizations require any Python packages (dependencies), **you must include them in a `requirements.txt` file in the root directory of your repository**. doploy automatically installs packages from this file during deployment. Without this file, your custom modules may fail to import required packages.
Example `requirements.txt`:
```
requests==2.31.0
pandas==2.0.3
python-dateutil==2.8.2
```
## Understanding Instance Types
doploy supports three types of instances, each mapped to a branch in your repository:
**Production Instance**\
Your live environment that serves real users. Typically connected to your `main`, `master`, or `production` branch. Changes here should be thoroughly tested.
**Staging Instance**\
A pre-production environment for final testing before going live. Usually connected to a `staging` or `develop` branch. Perfect for QA and client demos. Can use backups from your production instance to test with real data in a safe, neutralized environment.
**Development Instance (Add-on)**\
Automatically built for any new commits to branch not in production or staging. Each development instance runs Odoo's full test suite against your code, helping you catch issues before they reach production. Deploy and test as many times as you need.
 ## Step 1: Choose Instance Type
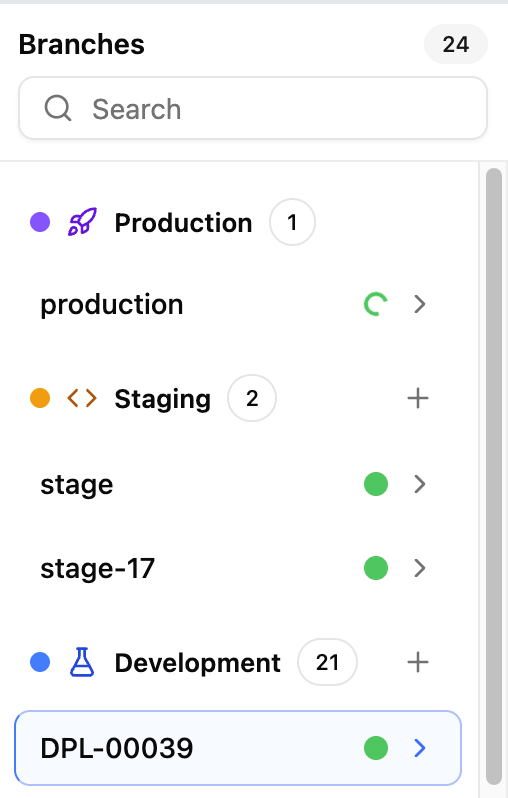
From your project dashboard, click the "+" button next to the type of deployment you want to create: Production, Staging, or Development.
This opens the deployment window where you can configure your instance.
## Step 1: Choose Instance Type
From your project dashboard, click the "+" button next to the type of deployment you want to create: Production, Staging, or Development.
This opens the deployment window where you can configure your instance.
 ## Step 2: Select Server
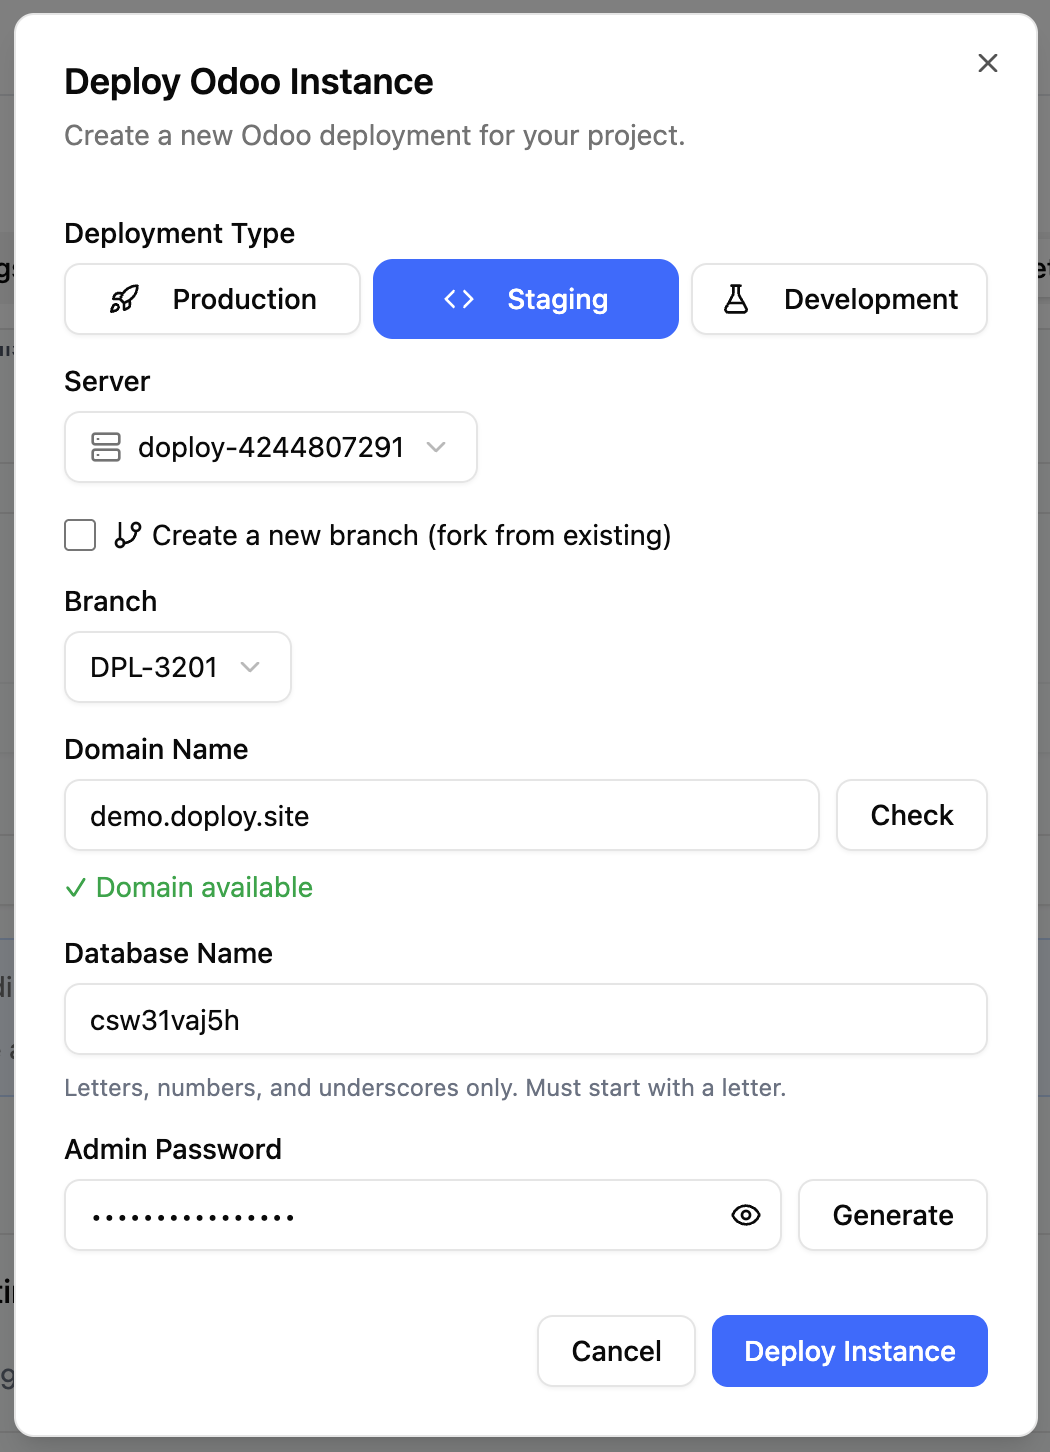
Choose which server to deploy your instance on. If you don't see your server yet, it may still be provisioning. You can check by going to your servers to view the status.
## Step 3: Select Branch
Choose which Git branch to deploy from. You can:
* **Select an existing branch** - Choose which branch to use for this odoo instance
* **"Branch From"** - Choose this if you would like to create a new branch in your repo based on an existing branch. This is prefect for creating a new staging branch off your eixisting production branch.
## Step 4: Configure Domain
Choose how users will access your Odoo instance:
**Free doploy subdomain** - Get a free `{your-name}.doploy.site` domain
**Custom domain** - If using your own domain, follow the instructions in the modal to add the required record to your domain's DNS record.
## Step 5: Database Name
Enter a name for your Odoo database. If left blank, doploy will generate one for you.
## Step 6: Admin Password
An admin password is automatically generated for your Odoo instance.
**Important:** Save this password now - it will not be shown again after deployment. You can change it later from within Odoo or [reset it via doploy](/managing-odoo/reset-admin-password).
## Step 7: Backup Configuration (Production Only)
For production instances, daily backups with 7-day retention are enabled by default. This ensures your data is protected from day one.
You can modify or disable backups after creation from your [backup settings](/getting-started/backup-schedule).
## Step 8: Deploy
Review your configuration and click "Deploy Instance" to start the deployment process.
Your instance will be available within in a few minutes.
## Next Steps
* [Migrate your data](/getting-started/migration) if you're moving from another platform
* [Set up automatic backups](/getting-started/backup-schedule) to protect your data
* [Configure DNS](/getting-started/dns-setup) to use your own domain
## Step 2: Select Server
Choose which server to deploy your instance on. If you don't see your server yet, it may still be provisioning. You can check by going to your servers to view the status.
## Step 3: Select Branch
Choose which Git branch to deploy from. You can:
* **Select an existing branch** - Choose which branch to use for this odoo instance
* **"Branch From"** - Choose this if you would like to create a new branch in your repo based on an existing branch. This is prefect for creating a new staging branch off your eixisting production branch.
## Step 4: Configure Domain
Choose how users will access your Odoo instance:
**Free doploy subdomain** - Get a free `{your-name}.doploy.site` domain
**Custom domain** - If using your own domain, follow the instructions in the modal to add the required record to your domain's DNS record.
## Step 5: Database Name
Enter a name for your Odoo database. If left blank, doploy will generate one for you.
## Step 6: Admin Password
An admin password is automatically generated for your Odoo instance.
**Important:** Save this password now - it will not be shown again after deployment. You can change it later from within Odoo or [reset it via doploy](/managing-odoo/reset-admin-password).
## Step 7: Backup Configuration (Production Only)
For production instances, daily backups with 7-day retention are enabled by default. This ensures your data is protected from day one.
You can modify or disable backups after creation from your [backup settings](/getting-started/backup-schedule).
## Step 8: Deploy
Review your configuration and click "Deploy Instance" to start the deployment process.
Your instance will be available within in a few minutes.
## Next Steps
* [Migrate your data](/getting-started/migration) if you're moving from another platform
* [Set up automatic backups](/getting-started/backup-schedule) to protect your data
* [Configure DNS](/getting-started/dns-setup) to use your own domain